🔗 Connect, Transfer, Conquer!
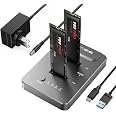
The ACASIS NVME to USB Docking Station is a high-performance M.2 SSD adapter designed for speed and efficiency. With a sleek aluminum housing that promotes superior heat dissipation, it supports data transfer rates of up to 10Gbps and accommodates SSDs of various sizes, up to 8TB. Its tool-free design and wide compatibility with multiple operating systems make it an essential accessory for professionals seeking reliable and fast external storage solutions.


| Compatible Devices | Windows, Mac, OS Linux, Android System |
| Data Transfer Rate | 10 Gigabits Per Second |
| Maximum Number of Supported Devices | 1 |
| Hardware Platform | Windows, Mac, OS Linux, Android System |
| Memory Storage Capacity | 8 TB |
| Hardware Interface | USB 3.1 Type C |
| Item Weight | 45 Grams |
| Item Dimensions L x W x H | 5.74"L x 4.01"W x 0.56"H |
| Material | Aluminum |
| Color | Gray |
B**.
ACASIS M.2 SSD hard drive dock
Great product. Very compact and sleek. Comes with a brief startup guide but I only read it to make sure I wasn't going to fry something. Once I was able to extract the old drive from the failed laptop, it took about a minute to set up the dock and begin reading the files that were stranded on it. It took longer to make sure I purchased the correct dock than to have it up and running. Works as it should, as advertised, the first time with no complicated instructions. Accomplished exactly what I needed it to do. Fast delivery, nice packaging, small instruction card (in English). Perfect.
M**P
easy switch out of drive, good performance over 10 Gbps connection
Over the years I've built up a small collection of old(er) nvme drives that are still operational. While these old(er) nvme drives are 'slow' when compared to newer drives, they are more than capable of sustained write rates of 900 MB/sec (more on this in a minute).I also have a small assortment of external enclosures and adapters for said nvme drives.For quick plug-n-play like operations this is my go to drive.When plugged into a USB 3.2 Gen 2 port (10 Gbps) my data copy operations (mostly backup operations) routinely run at 900+ MB/sec.There is a small blue LED next to the port where you plug in the nvme drive. This blue LED will blink during read/write operations.As mentioned I typically use this drive for performing regular backups of my computers ... software installation files, music files, virtual machine images, etc.What I really like about this particular drive is the small power button right next to the USB-C port. After making a backup I need to tell the system (Ubuntu/linux in my case) to unmount the external drive before I can remove it from the adapter. If I wish to switch out the nvme drive and run some additional backups I just need to cycle the power on this device so that my system will recognize the 'new' drive; with other adapters that don't have a power button I would need to unplug and (re)plug the adapter cable.
R**E
Works great, i have flashed multiple drives with it already.
I like its simple design and one button operation, it reads fast and copys fast too.
D**K
Very Good Performance and Function for the Price!
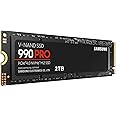
My Amazon order show this as Model M04B but on the box I received says this is Model EC-6606. I'm not sure if they're the same or different. The add also has inconsistent info about which version of USB 3.1 or 3.2 is supported. I think the build of this small device (2” x 2” square x ½” thick) feels well made with an aluminum case and some weight in the bottom. It’s nice that it also has a Power button. The included USB-C 3.2 cable with the attached USB-C to USB-A adapter works well. However, this cable is a short 11” and would have been much more useful with a minimum length of 18”. Before I talk about real results on both Windows 11 Home 64-bit and Linux Mint 22 64-bit there are some things you should do to your NVMe M.2 SSD before you write any data. I bought a Samsung 2TB 980 Pro NVMe PCIe 4.0 SSD and did the following:1. I connected this to Win11 and opened MiniTool Partition Wizard to view the drive info to see the disk partitioning was setup as MBR. I converted this to GPT but it would have worked fine as MBR (your choice).2. Turning on Write Caching on external drives (HDD/SSD) is important especially if you are writing large files or doing compressed disk image backups. This will reduce I/O bottlenecks and the amount of time it takes to write the data. To do this on Windows or Linux do the following:A. On Windows open Disk Management and right-click on the Disk (not a partition), click Properties, click on the Policies tab to verify Better Performance and Enable Write Caching on the Device are both enabled, then click OK. This will automatically disconnect then reconnect the Drive and its Partitions.B. On Linux Mint 22 open the Disks app, select the drive in the left pane, click the 3 vertical dots in the upper right corner, click Drive Settings, click the Write Cache tab, click the slider to turn on, In the Setting drop-down field select Enable Write Cache, and click OK. Either Logout or Restart Linux to make sure it is applied.3. Use the Disk Partition app of your choice on Windows (Disk Management, MiniTool Partition Wizard) or Linux (Disks, Gparted) to create the Partitions you need. I’m sharing this backup drive between Windows and Linux and setup the partition as follows:A. I left the first 6GB of space unallocated to setup later as a Boot Recovery partition.B. Setup a 931GB Ext4 partition for Linux.C. Setup a 728GB NTFS partition for Windows.D. I left 197GB unallocated at the end of the drive. SSD’s work better if you don’t allocate all the space because the modern drive controllers are smart enough to use that space for maintenance (Over Provisioning, Garbage Collection, TRIM, etc.). I recommend leaving a minimum of 10% of the drive capacity and up to 20% for very large SSD’s.Windows 11 Results:- Connected to HP Pavilion x360 USB-C 3.1 Gen1 port.- Using Macrium Reflect 8.1.8235 to create a Full compressed disk image for the OS Drive, all partitions, using 111GB of data.- This backup took 7min 24sec with an average Transfer Rate of 2.0 Gb/s, Source Read 5.8 Gb/s, Destination Write 3.4 Gb/s.- The compressed disk image backup is 71GB.Linux Mint 22 Results:- Connected to Lenovo Ideacentre All-In-One USB-A 3.0 port.- Booted PC from a RescueZilla 2.5.1 64-bit flash drive to create a compressed image of the internal Data partition that stores files for Plex Media Server (Movies, Music, Pictures, Videos) using 366GB of data.- RescueZilla doesn’t show stats like Transfer, Read, or Write rates. It took 1hr 6min to complete with a compressed Partition image of 318GB.- This should have run faster but the problem is Not with this NVMe Dock. Part of this is due to this PC being 8 yrs old and only supporting USB 3.0. Linux Mint 22 also could not treat this as full drive, and I was unable to access Drive Settings in the Disks app to Enable Write Cache. Linux also could not enable TRIM or S.M.A.R.T., both of which the drive is capable and was able to do on Windows. My older SATA Dock is able to do this on Linux with HDD and SSD drives. Maybe there is a Missing Driver for this Dock on Linux or because of the older USB Bus. I’ll update this review if I ever find a solution for this issue.Overall I would definitely recommend this NVMe Dock for its convenience, size, performance, and price. I will update this review in the future should this device start misbehaving or fail.
A**R
ACASIS NVME to USB Dock Station
This NVME device was the perfect for coping from one drive to a larger drive. I used Acronis True Imaging to do the transer. I had no issues while doing the transer. I highly recommend this device for anyone looking to make a transer. I went from 2TB to 4TB for my computer and now I have enough space to add on more files as needed.I would purchase this again in a heart beat!
D**K
Simple to Use and Fast
I used this to clone my desktop SSD to a new Samsung SSD using the Samsung Magician software. Using USB 3.0 and USB-C ports the transfer was fast! Be careful since your drive will be exposed, but it is easy to connect your SSD in the bay and the open air helps keep the SSD cooler as long as you are in a cool environment already. I have recommended this to all my PC building friends.
R**R
Easy to use no screws But died when I tried to use it later
Additional review.The product is not worth bothering with. I used it for a day or two, put it away then tried to use it a couple of months later and it was completely dead. No activity whatsoever. I used the included cable on another device and the cable works fine. Obviously VERY CHEAP construction.It was easy to use. No screws needed to mount the drive. Just snap it in and go.A little slow reading but for the money it does the job.
R**E
Works great!
Had a few other USB adapters, but they were wonky and required you to screw the drive in. This is a nice easy plugin unit that just works and is fast. I bought a second one to use both drives from my old laptop.wish it was slightly cheaper but you get what you pay for.
Trustpilot
1 month ago
2 weeks ago